Four free BlenderMCP skills: choose your first tool
Choose between a scene audit, island garden, lighting study, and camera orbit using actual examples and clear limits. Includes setup steps and when the paid interior kit makes sense.
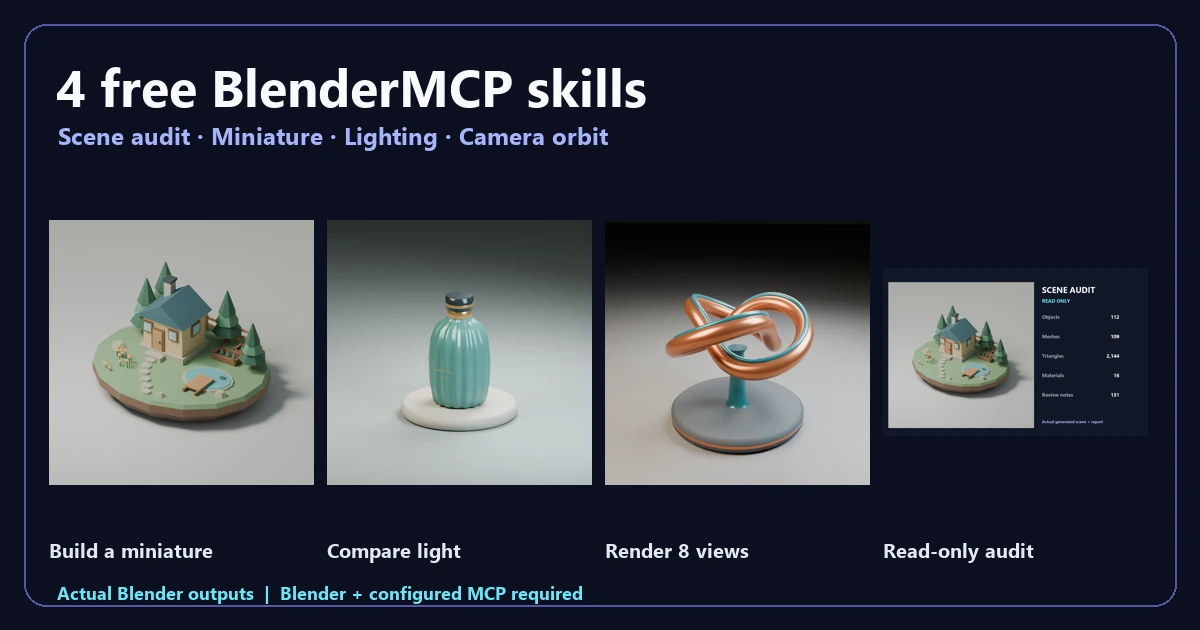
If you want to try Blender through an AI agent, a large first project can make troubleshooting harder: is the connection wrong, or is the scene recipe wrong? Start with one job: inspect a scene, make a still, compare lighting, or see another angle.
The four free skills on AI Skill Market cover those different jobs. Each skill costs JPY 0, but you need to log in to download it. You still need Blender and your own configured MCP connection.
Have a scene already? Inspect it first
Read-only Scene Audit helps you decide what to review before changing anything. It records object and mesh statistics, UVs, and material status in a JSON report and checklist. The supplied example audited a 112-object scene and produced actual report files.
It does not repair the scene. A boundary edge or missing UV can be intentional, so use the findings to choose what to inspect, not as a defect score. Evaluated modifier geometry and certification for 3D printing are outside its scope.
No assets yet? Start with an island garden
Island Garden, a low-poly miniature generator creates a cabin, pond, landing, and garden beds in a new scene. You can try composition and color without finding external models first. The tested example generated 112 objects and a 1024px PNG at 32 samples.
Changing just the palette is a useful first comparison. This skill adjusts the supplied miniature design; it is not a general modeler that can turn any text request into any object.
Want to study presentation? Compare the lights
Studio product lighting creates an original vessel and plinth. Compare a softbox, blue and orange rim lights, and warmer lighting with stronger shadows. Keeping the vessel the same makes the effect of the lights easier to see. All three presets have actual 1024px, 32-sample example renders.
The default renders only your selected preset. You must explicitly opt into rendering all three. This is a lighting study using the supplied stage, not automatic lighting optimization for every product you own.
Need to see the other side? Orbit the camera
Camera turntable and PNG sequence builds an original copper-colored sculpture and plinth in a new scene, then moves the camera around them rather than rotating the object. The tested example produced eight distinct 800px views to inspect reflections and silhouettes.
The output is a PNG sequence, not an encoded video. The default is 24 frames, with a supported range of 2 to 120. Try a small run of about four frames first, then consider render time and storage before increasing the count. Automatic fitting to an arbitrary model is outside scope too.
What to do after downloading
- Install Blender and configure your own agent to execute Python through BlenderMCP. The MCP connection is a separate setup task from installing a skill.
- Log in, download the ZIP, and follow the skill installation guide. Hermes Agent, Claude, Codex, and Cursor each need their own connection configuration.
- Read SKILL.md and the included code. Choose the target scene, output location, and render count. Generators need an unused scene name; follow each README's specific output-directory requirements.
- Try a small render and open the actual output files. Save important work first, then increase quality after reviewing the result.
The examples described here were tested on Windows with Blender 5.2.2 LTS and mcp-for-blender 2.2.8. They are representative tests, not verification across every operating system or client. Images and render times can vary with the environment. These are skill demonstration renders, not past client commissions.
When you are ready to stage furniture in a room
Once you have checked the connection and rendering with a free skill, consider BlenderKit Interior Showcase if your next task is arranging acquired furniture and testing interior compositions. Its displayed buyer price is JPY 5,625. The kit includes three recipes with two cameras each, plus rights, quality, and recovery checklists. The example used Vintage Armchair and Side Table 01, acquired and reviewed as CC0 assets, and rendered all three presets. Main examples use 1280x960 at 64 samples.
You configure BlenderKit and acquire the assets yourself, checking their licenses at acquisition. Furniture models, textures, finished .blend files, accounts, and credentials are not included. The kit does not guarantee the same finish for every furniture model.
If you are undecided, choose the audit for a scene you already have, or the island garden if you do not. If you know the job, pick the relevant skill from the five-skill collection.
Setup and usage references
Official Blender download / Official installation manual / mcp-for-blender setup documentation / Asset licenses / Asset licensing FAQ